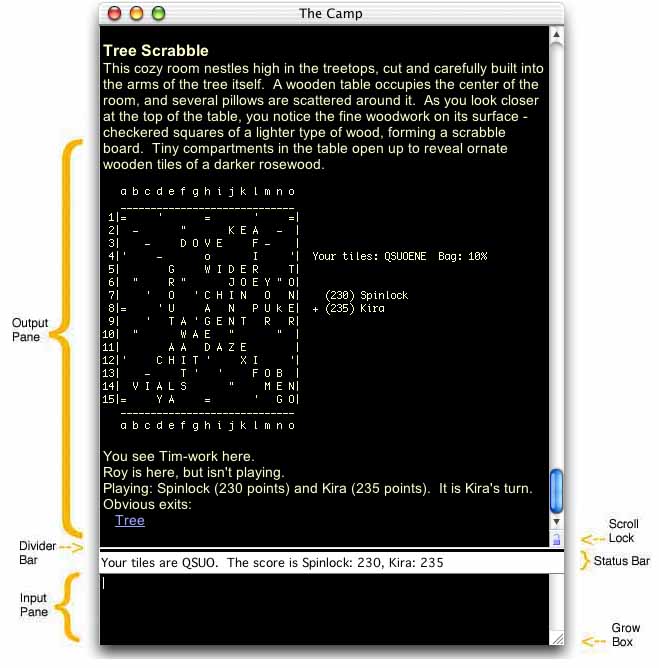
This window is made up of two primary parts. The top area, where incoming text from your world is displayed, is called the "Output Pane." The bottom area, where you type input is called the "Input Pane."
The output and input panes are measured in terms of text rows and columns. The default size for a newly created world is 80 rows by 24 columns. Said more simply, that's 80x24. The default size for the input pane is 80x2.
When you resize the session window using the grow box, at the window's lower right-hand corner, The row and column dimensions of the output pane will change according to how you grow or shrink the window. When you resize the window this way, a little yellow popup window will appear indicating the rows and columns of the current rows/cols of the output pane as you are dragging the grow box.
There is also a "divider bar" that lets you change the vertical sizes of the output and input panes. Dragging the divider bar up using the mouse will decrease the text rows of the output pane and increase the rows of the input pane. Dragging the divider bar down will increase the rows of output and decrease the rows of input. When dragging the divider bar a little popup window will appear indicating the current size of the output pane.
The output and input panes can also be resized via text entry of rows and columns in the respectively in the "Output" and "Input" tabs of the World Settings.
Clicking on the scroll lock icon will toggle scrolling on and off for the output pane. By default, scroll locking is disabled. Enabling scroll locking is useful for times where you wish to scroll back and read something in the output and not have new incoming text jump your scroll bar back to the bottom of the pane.
You can toggle scroll locking from the keyboard with Control-S.
| Home |
scroll to top of output |
| End |
scroll to bottom of output |
| Page up |
scroll up one page of output |
| Page Down |
scroll down one page of output |
| control-L |
clear current output (does a select-all and a cut) |
| control-S |
toggle scroll locking |
Status bars are something you can enable and disable to show additional information of your choosing. In version 1.1 of Savitar, you can have a status bar assigned to the input pane, as depicted in the above Session Window screenshot, and/or one in the output pane (not depicted).
To learn how to setup and use status bars, please refer to the "set status" and "close stats" commands described in the "Local Commands" section of this manual.
You can enter one or more lines of commands in the input pane. Hitting return will send the command off to your world. If you have enabled 'Echo All Input' in the "World Settings" dialog, your commands will be first displayed in the output pane in the form they are sent to the world.
Commands you have entered can be recalled from the command recall buffer by pressing the up-arrow on your keyboard. When you get to a previous command you want to use, simply edit it to your liking and then hit return. You can also move forward through the command recall buffer using the down-arrow key.
For some Worlds, there's a high need to enter the same command rapidly. There's a World setting for keeping the command selected after sending it. Subsequent pressing of the Return key will resend the command. To learn more about this setting, refer to the Settings section of this manual referring to the Input Tab of the World Settings dialog.
More than one command can be entered at the same time by separating each command with Option-Return key presses. Pressing a final Return will then send all the commands you have entered all at once to the world.
You use Option-Return when you want to enter multiple commands for a world's startup script, trigger reply, or macro key.
The wait command is what is known as a Savitar "local command." The Local Commands Reference section of this manual covers all of Savitar's commands.
The wait command can be used to insert a time delay before a command. The format for this is:
<command-marker>wait <seconds>
Where <seconds> is a 1 to 4 digit number of seconds you want the command to wait.
Example. Say you wanted to set up a automatic login that paused one second after the username "sally" was entered before entering the password "foobar". Assuming your command marker was set to "##" here's what you would enter into your world setting dialog's Connection Command(s) text pane:
sally(return)
##wait 1 foobar(return)
Where (return) is the return key.
The up and down arrow keys will recall previous or next command. The last 32 commands you entered are recallable.
The following keys are available for editing commands in the input pane:
| shift-leftarrow |
select one character to the left |
| shift-rightarrow |
select one character to the right |
| option-leftarrow |
go to start of word |
| option-rightarrow |
go to end of word |
| command-leftarrow |
go to start of command line |
| command-rightarrow |
go to end of command line |
| option-shift-leftarrow |
select one word to the left |
| option-shift-rightarrow |
select one word to the right |
| command-shift-leftarrow |
select from cursor to start of input pane |
| command-shift-rightarrow |
select from cursor to end of input pane |
| option-return |
insert a carriage return |
| control-u |
clear current input (does a select-all and a cut) |
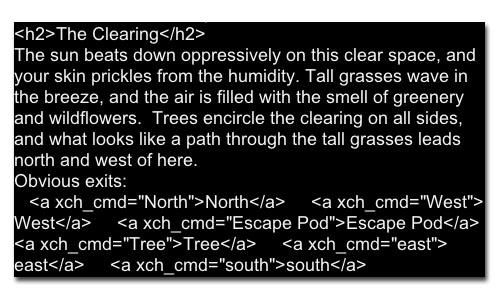
When HTML parsing is enabled (settable from the world's Appearance settings tab), then the special <xch_cmd> command processing is also enabled.
This screenshot is a snippit of output from a world with HTML on, showing six <xch_cmd> generated commands (the blue underlined links):
...and here is the same output with HTML off:
When you mouse-over these links, a small hovering window will appear telling you what command will be sent to the ser ver on your behave when you click on it. As a safety precaution, there's a "send xch_cmds immediately" checkbox in the world's Appearance setting tab. It's off by default.
xch_cmd is a concept borrowed from Pueblo. Original documentation for xch_cmd can be found here: http://www.cubik.org/mirrors/pueblo/www.chaco.com/pueblo/doc/manual/puebloxchcmd.html Here's the text from the link:
This is an anchor field which indicates that the specified command should be sent to the World (MUD, session, etc.) when the anchor is selected.
Examples:
In this example, the anchor text will be "Take a look at Jim", and when that text is selected (clicked on, etc), the command "look Jim" will be sent to the World:
Take a look at <a xch_cmd="look Jim">Jim</a>.
This example is similar, but uses xch_hint:
You can go <a xch_cmd="go north" xch_hint="Go North">North</a>.
Savitar supports the concept of "triggers", allowing you to set up automatic reactions that are triggered on one or more characters matched from the output of a world (known as an output trigger), or one or more characters mtached from what you have typed to the world input pane (known as an input trigger). You can also create triggers which match on both input and output.
To work with triggers, select the 'Events Window' menu item in the 'Windows' menu and select the "Triggers" tab. A list will appear which will allow you to add, edit, reorder, or remove triggers. The behavior of the Triggers list is similar to the Mac OS Finder's file view. You can drag/drop triggers to and from the list just as you would files in the Finder. Plus you can rename triggers in place as you would rename files in the Finder.
Triggers can be added, edited, moved, renamed, and deleted. See the Editing Items section of this document for details.
Triggers are handled in the order they are listed. Each time new text arrives (for output triggers), or is sent (for input triggers), Savitar goes through the triggers list top to bottom. First the universal triggers, and then any triggers you may have assigned specifically to the world. Ordering of triggers can be changed. See the "Rearranging Triggers" section below for details.
When a match has occurred, Savitar reacts on the text based on how you set up the trigger. This reaction is often referred to as a "triggered action." Savitar will apply all the reactions that match the input, thus a trigger for "hey" can be superceded by a subsquent (further down the list) trigger named "heynow".
There are a number of ways to add a new trigger:
1) Select the "New Trigger" menu item in the Edit menu, or type Command-K. This will create a new boldface trigger named "<new trigger>".
2) Select an existing trigger and copy/paste it.
3) Drag an existing trigger to a new location with the option key held down -- this copies the existing trigger to a new trigger.
4) Drag a piece of text from the output or input pane to the trigger list. This will automatically create a new trigger named after the text you dragged.
Single clicking on an trigger's name will allow you to edit any trigger's name in place.
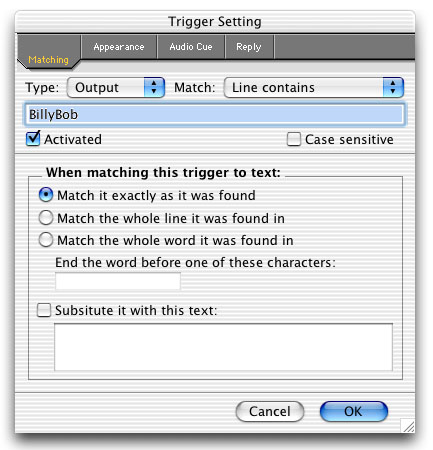
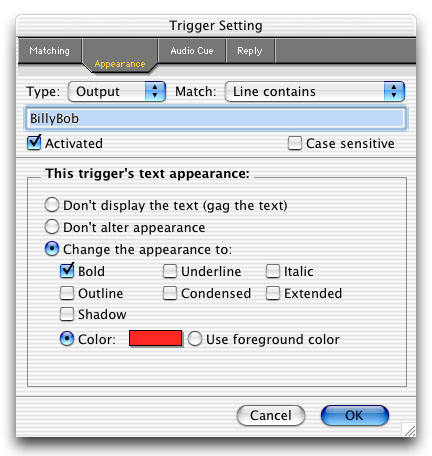
Double clicking on an trigger will automatically put you into the trigger's edit dialog. The edit dialog is divided up into four tabbed panels.
Savitar supports three types of triggers, accessable via the "Type" popup menu:
output -- do the trigger matching on incoming text (text outputted by the server)
input -- do the trigger matching on outcoming text (text inputted by you)
both -- do the trigger matching on both output and input.
Savitar supports three methods of doing matches, accessable via the "Match" popup menu:
Line contains -- match the text with anywhere within a line
Line starts with -- match only on lines that start with the text
Regular expressions -- use unix-style regular expressions to match the text.
O'Reilly's Mastering Regular Expressions is an excellent read for an understanding of the powerful flexibility available in regular expressions.
Matching Tab
This tab is used for defining the nature of the text you wish to trigger on. Triggers can be matched case sensitive or not. When they do match, they can be an exact match with the text, the word the trigger occurred in, or the entire line of text the trigger was found in.
When specifying "match the whole word", a word is defined as "a string of characters until a space or carriage return is encountered." You have the option to specify special characters to terminate the word earlier however. For example, in the "html://" trigger, you want the whole word to trigger, but not any double-quote character that may immediately follow (thus URL clicking will operate correctly.)
Appearances Tab
This tab allows you to define how the text that is triggered upon appears visually in the world's text output pane.
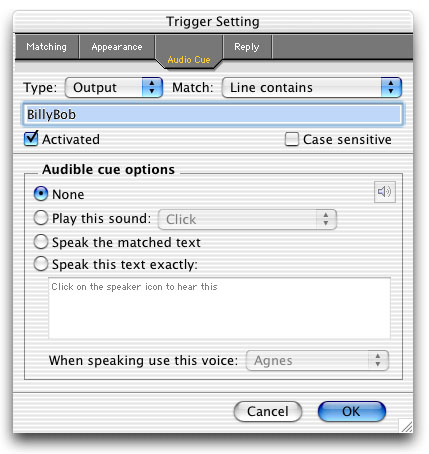
This tab allows you to attach an audible cue to the trigger.
Possibilities for audio cue include these options:
1) play a sound -- Pick a sound from the popup menu. Need a new sound? Record one from your control panel, relaunch Savitar and it'll appear in the popup.
2) speak the trigger -- Savitar will speak the text that triggered using the voice specified.
3) speak some arbitrary text -- When your trigger fires, Savitar will speak specific text you specified.
Note: In Savitar 1.4 and later, another audio option you have is to enable the "Continuous speech" feature. When this feature is enabled, all incoming text from your world is spoken. See the section Continuous Speech Settings for more information.
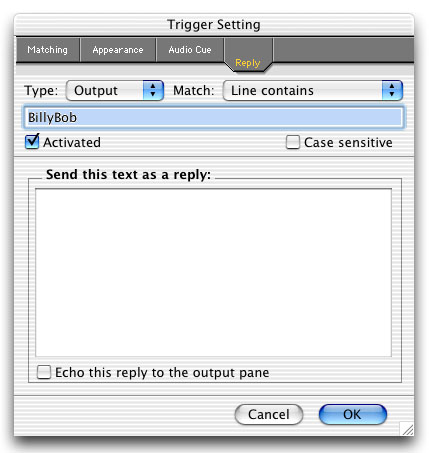
Reply Tab
This tab lets you automatically send up to 255 character of text to the world when the trigger fires.
You can specify mutliple commands by separating them with the return key. If you have checked the 'echo trigger reply" option, when a reply triggers the message:
[Triggered Reply:"<reply-text>"]
is displayed in the output pane after which Savitar will then immediately send the reply text. If 'echo trigger reply' isn't checked, Savitar silently sends the reply.
If you wish to use a wildcard in your trigger's name or if you wish to set a macro via a trigger, use your world's wildcard marker. The default wildcard marker is "$$". Thus, for example, if you want to match a trigger on a line that starts with "["and ends in "]", you can create a trigger named "[$$]".
Optionally, you can set a macro by specifying a macro name immediately after the wildcard marker. Combining this with triggered replies provides a form of scripted automation.
For example, say you want to automatically congratulate a person when (s)he gets promoted to a new experience level. On your world, a message of:
"[<name> has reached level <number>.]"
is displayed to all when that occurs. You can create a trigger named:
"[$$name has reached level $$level.]"
And set the trigger's auto-reply to:
"page %%name Congratulations on reaching level %%level!!"
Thus, when Savitar sees:
"[Billy-Bob has reached level 23.]"
Savitar will automatically send the following command to your world:
"page Billy-Bob Congratulations on reaching level 23!!"
Its easy to capture a single word to a macro. Say you want to capture the word following "boinks" in the following sentence:
"Billy-Bob boinks Johnny in the knee!"
Create this trigger:
"boinks $$1 $$"
When the trigger fires, macro %%1 will be set to "Johnny".
When a trigger sets a macro that does not already exist, Savitar will automatically create the macro for the world it was triggered in.
Up to 15 wildcards can be set per trigger.
When matching kind is set to "regular expressions", regex memories are saved out as macros in the format of %%n. Where n is 0..number of memories. Macro %%0 always contains what was matched.
Example
Doing a match on (sans the double-quotes):
"Well... hi Bob, did you find it?"
with the regular expression (sans the double-quotes):
Will result in these variables being set:
%%0 = "hi Bob, did you find it?"
%%1 = "Bob"
%%2 = "did you find it?"
Savitar imposes no practical limit on the number of macros one can set using regular expressions.
You can test your regular expressions out using the Savitar local command ##regex "text" "expression". It will list the variables it sets too.
Savitar supports the use of client-side macros. Macros are managed via the "Macros" tab in the "Events Window" Window menu option.
Single clicking on an macro's name will allow you to edit any macro's name in place.
Double clicking on an macro will automatically put you into the macro's edit dialog:
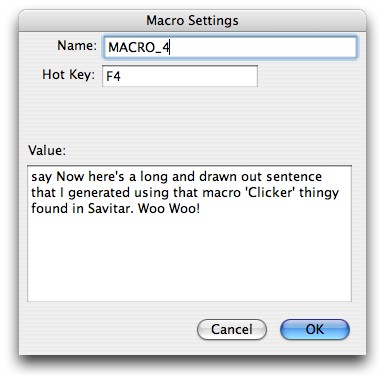
A macro can be specified during input in the form of <macro-marker><macro-name>. A macro's name can contain letters or numbers in any combination.
Macro markers are 0-2 characters in length. The default macro marker is '%%', which is resettable via the World Settings Dialog. Defining a 0 character macro marker in the settings dialog indicates you don't want any macro detection to occur.
Example: To specify your favorite reaction to hearing some good news you could define the 'news' macro to say:
"Well, that's some darn good news".
Then when you type:
"say %%news friend!"
it gets sent as:
"say Well, that's some darn good news friend!"
A macro can refer to other macros too, allowing nesting.
Macros can be set automatically by triggers. See the Triggers section of this document for further details on how to set this up.
Macros can be added, edited, moved, renamed, and deleted by the same means as triggers are. See the Editing Items section of this document for details.
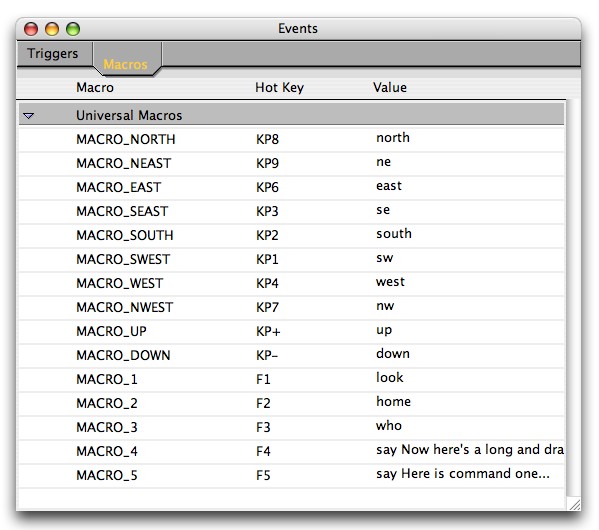
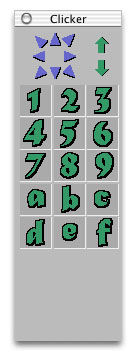
Under the Window menu is found the 'Macro Clicker' item. The Macro Clicker is a programmable device permits up to 25 buttons to be defined with command macros. Clicking on one of this Macro Clicker buttons will send the button's assigned macro to the connected world.
| Keypad '8' |
north |
|
Keypad '9'
|
norheast
|
|
Keypad '6'
|
east
|
|
Keypad '3'
|
southeast
|
|
Keypad '2'
|
south
|
|
Keypad '1'
|
southwest
|
|
Keypad '4'
|
west
|
|
Keypad '7'
|
northwest
|
You can globally disable the use of the keypad as a compass directional device by unchecking the 'Enable Keypad macro keys" checkbox in the application settings.
You can change a macro clicker button's assigned value by clicking on it while holding the Command-key down.
Savitar version 1.1 introduced a feature referred to as "Macro Pop-ups." They works like how Microsoft Word 98 handles "AutoText" -- a wee little popup window will appear when the last 3 or more letters you type match the beginning of a macro (variable) you've got. The popup will display the value of the macro. Hitting the return key will accept this value and Savitar will automatically replace the matching letters with this value.
Example:
Say you had a macro called "cure" with the value "cure everyone" assigned to it. When you type "cur" in the world's input pane, the popup window will appear containing "cure everyone". Press return, and the letters "cur" in the input pane get replace with "cure everyone."
The following actions are valid in the World Picker table, the Triggers table and the Macros table. Where "Item" is referring to a world, trigger or macro.
You can select items in the list by using the up or down arrow keys, or dragging the mouse over them with the mouse button down, or single-clicking them with the shift key held down.
You can copy an existing item by using copy/paste, or by dragging it with the option key held down, or by using the 'Duplicate Item' menu item in the Edit menu.
Items are deleted by using the Edit menu's "Cut" command on the trigger(s) you have selected. If you change your mind after a "Cut" you can "Paste" it back.
Items can be reordered within a world or can be dragged from one world to another. This is accomplished by selecting one or more items and dragging them to a new destination. You can also move items by cutting and pasting.
Dragging an item creates an XML-based description of the item. The drag destination can be the desktop, which will create a clipping of the item, or to a world's input pane, which will allow you to send the object to friends on the net. In turn, they can drag the object's XML text to the respective worlds, triggers, or macros window.
Items can be renamed by simply single clicking on their names and doing keyboard edits, just like renaming a file in the MacOS Finder.
This one is true for macros and triggers, not worlds.
There is a green check-mark in the left column which indicates if the macro or trigger is currently enabled. Clicking on the check-mark will toggle the item as enabled or disabled (a red X mark). This feature is handy if you wish to temporarily disable an item, but not actually delete it.
You can also disable a macro or trigger from within its edit dialog by unchecking the "Enabled" checkbox.
All open world and text windows appear in the 'Windows' menu. As a keyboard shortcut, you can use Command-<#> to select the window you want to switch focus to. Where <#> refers to a number between 1 and 9.
You can use the key combination Command-[ to go to the previous window, or Command-] to pick the next window.
You can send and receive HTML stylized text. Menu items are available in the 'Text' menu for Plain (Command-/), Bold (Command-B), Underline (Command-U), Italic (Command-I), Bigger (Command-equals), and Smaller (Command-minus). This is accomplished by embedding HTML tags in output and interpreting them in the output pane.
The following HTML tags are recognized by Savitar's text output pane:
| Opening Tag |
Closing Tag |
| <b> |
</b> |
| <big> |
</big> |
| <code> |
</code> |
| <em> |
</em> |
| <h1 <h2> <h3> <h4> <h5> <h6> |
</h1> </h2> </h3> </h4> </h5> </h6> |
| <html> |
</html> |
| <i> |
</i> |
| <font color=<color-name> | ##RRGGBB> |
</font> |
| <font size=[+|-]nn> |
</font> |
| <pre> |
</pre> |
| <small> |
</small> |
| <tt> |
</tt> |
| <u> |
</u> |
| <xch_cmd="{command}"> |
{label}</a> |
Here's an example. Say you wanted to display the following text:
I like the bold flavor of Big Red(tm) gum.
Here's what you would type:
I like the <b>bold</b> flavor of <big><big><font color=red>Big Red</font></big></big><small><small>(tm)</small></small> gum.
Just as it is true for web pages, Savitar's normal text size can be returned to by doing a <font size=3>.
If you have Internet Config installed (comes with System 8.1 and later), Savitar will permit command-clicking of URLs which will then automatically invoke your favorite Web browser or Emailer.
Savitar also supports the "GURL Apple Event Suite" which permits Savitar to be invoked from applications such as the Eudora™ e-mail application.
You've seen those web page links like telnet://fringe.haven.org:7777 on web pages right? When you click on them they usually will launch NCSA Telnet or some other telnet app and take you to a login prompt or Moo/MUD. Well, Savitar can now be launched as your telnet app. Simply redirect your Browser to use Savitar as your telnet helper app.
Use the 'Upload' menu item in the 'Text' menu to directly transfer text from a file to your world.
Use the 'Capture' menu item in the 'Text' menu to start/stop logging a world session to a log file. By default, Savitar creates its log files as Savitar text documents, however, you can change this so Savitar creates its log files as BBEdit™ or MS Word™ text documents. Use the "Logfile binding" popup menu iin Savitar's application settings dialog to switch this behavior.
Savitar has the ability to open its own text log files as well as any other sort of text file. You can make changes to these files and save the changes right from within Savitar . To open an existing text fiile, use the "Open..." menu option in the "File" menu. To create a new text file, select the "New Text Document" menu option in the "File" menu.
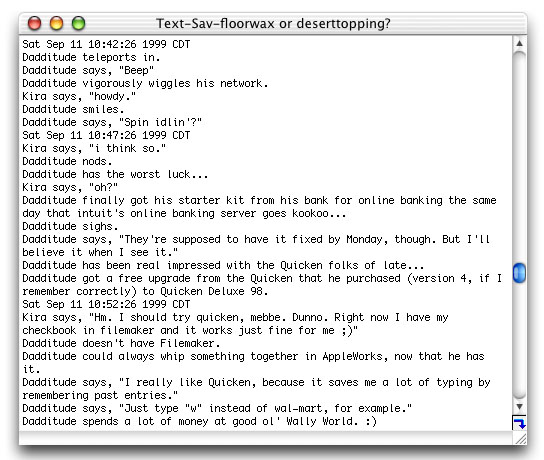
The above screenshot depicts a text file opened by Savitar. Savitar titles text file windows with the file's name preceeded with "Text-". In this example, we've got a text file named "Sav-floorwax or deserttopping?" opened.
Notice the little blue arrow icon at the bottom right. This arrow indicates that word wrapping is currently enabled for this window. To turn off word wrapping, simply click the arrow. It'll change from a "wrapped" arrow (as you see here) to a straight arrow, which represents word wrapping is off.
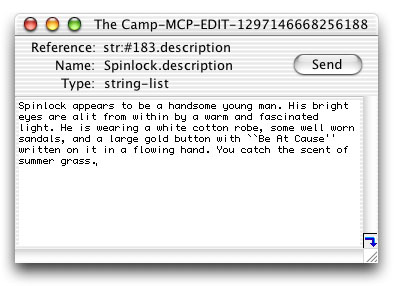
With the advent of version 1.3, Savitar supports the MCP SimpleEdit module. The world you connect to has to have MCP support. For information about MCP, see http://www.moo.mud.org/mcp/mcp2.html.
Here's the MCP window that comes up when doing a generic text edit:
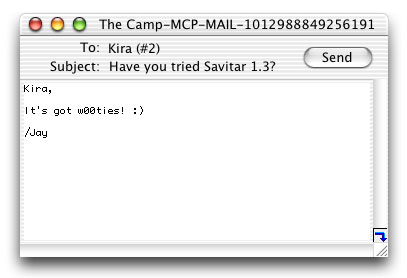
Savitar will recognize MCP SimpleEdit-based mail messages and put up a custom window for mail. Here's an example:
You can change the font and set some other MCP related stuff in your world's "MCP" settings tab.
Did you know that you can drag text from Savitar windows right to the desktop and it'll save as a text clipping? You can also drag from the desktop to Savitar.